TMS320C6657 IPC 双核开发报告(IPC&Message)
版本:1.0
前言:本文通过IPC中的MessageQ模块,基于Sys/Bios OS系统,实现TMS320C6657双核的收发操作。下面将根据上述例程来介绍每部分的相关实现。
工程的创建
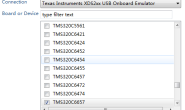
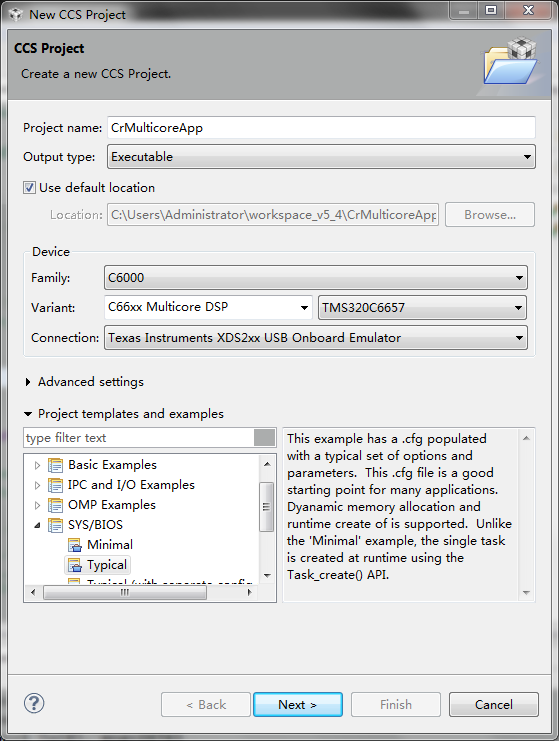
工程创建使用Sys/Bios标准模板,如下图所示。其中器件选择“TMS320C6657”,仿真器选择“Texas Instruments XDS2xx USB Onboard Emulator”。“Project templates and examples”选择“SYS/BIOS”下的Typical。
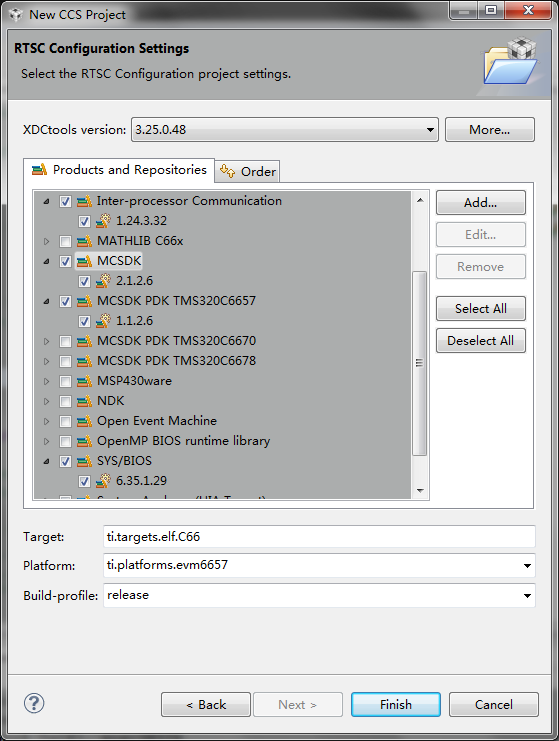
接下来,配置所需要的开发包,如下图所示。根据需要进行勾选相应的开发包,“Inter-processor Communication”是双核开发的必选项。“Platform”选择“evm6657”。
以上完成工程的建立。
SYSTEM BIOS 配置
编写代码
复制如下代码到main.c中,并且删去原有的代码。
/*
* ======== mutex.c ========
* This example shows the use of two tasks and one semaphore to perform
* mutual exclusive data access.
*/
#include <stdio.h>
#include <xdc/std.h>
#include <xdc/runtime/System.h>
#include <ti/sysbios/BIOS.h>
#include <ti/sysbios/knl/Clock.h>
#include <ti/sysbios/knl/Task.h>
#include <ti/sysbios/knl/Semaphore.h>
#include <xdc/cfg/global.h>
/* XDC.RUNTIME module Headers */
#include <xdc/runtime/System.h>
#include <xdc/runtime/IHeap.h>
#include <xdc/runtime/Timestamp.h>
/* IPC module Headers */
#include <ti/ipc/MultiProc.h>
#include <ti/ipc/MessageQ.h>
#include <ti/ipc/SharedRegion.h>
/* PDK module Headers */
#include <ti/platform/platform.h>
/* CSL modules */
#include <ti/csl/csl_cacheAux.h>
#include <ti/csl/csl_chip.h>
#include <ti/sysbios/syncs/SyncSem.h>
Void task1(UArg arg0, UArg arg1);
Void task2(UArg arg0, UArg arg1);
Int resource = 0;
Semaphore_Handle sem;
Task_Handle tsk1;
Task_Handle tsk2;
Task_Handle tsk3;
Int finishCount = 0;
#define HEAP_ID 0
Int selfId;
char MyMsgQName[6] = “MyMsg0”;
typedef struct {
MessageQ_MsgHeader header; // Required
int cr; // Can be any field
} MyMsgStr,*pMyMsgStr;
//MsgMsgStr MyMsg[10] ;
//Task_HookSet *Hook_Task1;
/*
* ======== main ========
*/
Void main()
{
Task_Params taskParams;
SharedRegion_Entry entry;
Int status;
selfId = CSL_chipReadReg (CSL_CHIP_DNUM);
/* Create a Semaphore object to be use as a resource lock */
sem = Semaphore_create(0, NULL, NULL);
/* Create two tasks that share a resource*/
Task_Params_init(&taskParams);
//taskParams.__fxns = Hook_Task1;
taskParams.instance->name = “TASK1”;
taskParams.priority = 15;
tsk1 = Task_create (task1, &taskParams, NULL);
//tsk1.fxn = Hook_Task1;
Task_Params_init(&taskParams);
taskParams.instance->name = “TASK2”;
taskParams.priority = 5;
tsk2 = Task_create (task2, &taskParams, NULL);
status = Ipc_start();
if (status < 0) {
printf(“Ipc_start failed from Core%d,ERR=%d!\n”,selfId,status);
}
/* Register this heap with MessageQ */
do{
status = MessageQ_registerHeap((IHeap_Handle)SharedRegion_getHeap(0), HEAP_ID);
if(status < 0){
//System_abort(“Should not happen; timeout is forever\n”);
printf(“MsgQ Heap Error!! Err = %d”,status);
}
}while(status < 0);
BIOS_start();
}
/*
* ======== task1 ========
*
* Receive Model
*
*/
Void task1(UArg arg0, UArg arg1)
{
MessageQ_Handle MyMsgQHandle;
MessageQ_Params MyMsgQParams;
//SyncSem_Handle syncSemHandle;
pMyMsgStr pMyMsg;
Int status;
if(selfId == 0){
//syncSemHandle = SyncSem_create(NULL, NULL);
MessageQ_Params_init(&MyMsgQParams);
//MyMsgQParams.synchronizer = SyncSem_Handle_upCast(syncSemHandle);
MyMsgQHandle = MessageQ_create((String)MyMsgQName,&MyMsgQParams);
printf(“core 0 Task1 is running! MessageQ_created\n”);
//Task_sleep(1);
}
else{
//Task_sleep(1);
}
for (;;) {
if(selfId == 0){
status = MessageQ_get(MyMsgQHandle,(MessageQ_Msg *) &pMyMsg, MessageQ_FOREVER);
if (status < 0) {
System_abort(“Should not happen; timeout is forever\n”);
}
//printf(“Core 0 received the message!\n”);
printf(“Core0 received msg.cr is %d!\n”,pMyMsg->cr);
MessageQ_free((MessageQ_Msg) pMyMsg);
}
else{
Task_sleep(1000);
}
//Task_sleep(100);
}
}
/*
* ======== task2 ========
*
* This is Send model;
*
*/
Void task2(UArg arg0, UArg arg1)
{
MessageQ_QueueId remoteQueueId;
Int status;
//MessageQ_Msg msg;
pMyMsgStr pMyMsg;
int i = 0;
if(selfId == 0){
Task_yield();
}
else{
/* Open the remote message queue. Spin until it is ready. */
do {
status = MessageQ_open ((String)MyMsgQName, &remoteQueueId);
Task_yield();
}
while (status < 0);
}
for (;;) {
if(selfId == 0){
;
}
else{
pMyMsg = (pMyMsgStr) MessageQ_alloc(HEAP_ID, sizeof(MyMsgStr));
pMyMsg->cr = i++;
if (pMyMsg == NULL) {
System_abort(“MessageQ_alloc failed\n”);
}
printf(“Send selfProc=%d To(%d). msg=%d\n”, CSL_chipReadReg (CSL_CHIP_DNUM), remoteQueueId, pMyMsg->cr);
/* Kick off the loop */
status = MessageQ_put(remoteQueueId,(MessageQ_Msg) pMyMsg);
if (status < 0) {
System_abort(“MessageQ_put failed\n”);
}
}
Task_sleep(1);
}
}
任务分配
以上编写的代码中,用C的方式创建了两个任务(TASK),TASK1主要由Core0执行,负责创建MessageQ、接收Core2发来的Message。TASK2主要由Core1执行,负责打开已经创建的MessageQ、向MessageQ中发消息。
IPC模块初始化
双核都必须初始化,并且分配双核共享空间。
调用Ipc_start();完成核的IPC初始化,这里需要在配置文件中配置
/* Synchronize all processors (this will be done in Ipc_start) */
Ipc.procSync = Ipc.ProcSync_ALL;
以保证IPC会在双核都执行Ipc_start()并同步之后才会执行后面的代码,关于IPC的配置的更多详细资料可以查阅SYS/BIOS Inter-Processor Communication (IPC) 1.25 User’s Guide,SPRUGO6E,2.2.1 Ipc Module Configuration。
配置MessageQ的共享空间
调用
MessageQ_registerHeap((IHeap_Handle)SharedRegion_getHeap(0), HEAP_ID);
这里SharedRegion的Heap是需要配置的:
var SHAREDMEM = 0x0c000000;
var SHAREDMEMSIZE = 0x00050000;
SharedRegion.setEntryMeta(0,
{ base: SHAREDMEM,
len: SHAREDMEMSIZE,
ownerProcId: 0,
isValid: true,
cacheEnable: true,
cacheLineSize: 128,
createHeap: true,
name: “internal_shared_mem”
});
Memory.defaultHeapSize = 0x10000;
Program.heap = 0x10000;
配置完成后IPC的MessageQ模块就可以正常调用。这里需要指定一个Heap_ID,这是用户定义的,本例中是0。更多的配置信息可以查询SYS/BIOS Inter-Processor Communication (IPC) 1.25 User’s Guide,SPRUGO6E,2.3.1 Configuring the MessageQ Module & 2.8 SharedRegion Module。
CORE 1 发送过程
系统消息同步
核间系统消息同步是通过IPC开发包来实现的,使用Ipc_start();功能函数(并配置为ALL的方式)。每个核会等待其他的核调用Ipc_start();函数后才会跳出该函数,否则无限等待其他核的调用,具体核间数据交换是通过以下的方式来进行:
(1)MessageQ_get()CORE0等待CORE1的同步信号
(2)MessageQ_put()CORE1发送应答信号给CORE0
接收用户加载的数据
首先定义一个自己的结构体,要求该结构体的最顶端是以下成员变量:
MessageQ_MsgHeader header;
后面的成员变量可以自由定义。
发送端使用该结构体的类型来申请内存空间,使用方式如下:
pMyMsg = (pMyMsgStr) MessageQ_alloc(HEAP_ID, sizeof(MyMsgStr));
其中MyMsgStr为自定义的结构体类型。HEAP_ID是注册的内存空间ID。
接下来使用MessageQ_put()把需要传递给指定核的内容信息发出去,使用方式如下:
status = MessageQ_get(MyMsgQHandle,(MessageQ_Msg *) &pMyMsg, MessageQ_FOREVER);
CORE 0 接收过程
系统消息创建
首先创建一个消息队列,具体实现方式如下:MessageQ_Params_init(&MyMsgQParams);
MyMsgQHandle = MessageQ_create((String)MyMsgQName,&MyMsgQParams);
接下来调用MessageQ_get()来等待消息消息队列的消息,具体实现如下:
status = MessageQ_get(MyMsgQHandle,(MessageQ_Msg *) &pMyMsg, MessageQ_FOREVER);
双核通信
- 任务的发送
任务Task2()此程序完成数据的发送操作。具体过程如下:
Void task2()
{
if (selfId == 0)
{
……
}
if (selfId == 1)
{
……
}
}
当selfId=0,可以判断为CORE0。因此if (selfId == 0)里面为发送数据代码。
当selfId=1,可以判断为CORE1。因此if (selfId == 1)里面为发送数据代码,目前没有使用做睡眠操作。
具体过程如下,例如TstMsg *txMsgPtrs[]为结构体数组。
其中MyMsgStr结构体为
typedef struct {
MessageQ_MsgHeader header; // Required
int cr; // Can be any field
} MyMsgStr,*pMyMsgStr;将需要发送的消息赋值如下seqNum=0x55,即可以将CORE0中的数据发送给CORE1.当selfId=1,CORE1执行接收数据同样查看TstMsg-> seqNum,可以得到0x55。
双核DEBUG
双核间调试可以看做是两个核分别独立调试操作。例如将qmssIpcBenchmark例程通过仿真器下载到DSP中。然后两个核可以分别设置断点以及DEBUG调试。
- 将此工程分别烧写到CORE0和CORE1
- 运行CORE0,此时CORE0开始执行发送数据,如图所示
图1 CORE0 运行
- 这个时候切换到CORE1,如下图所示
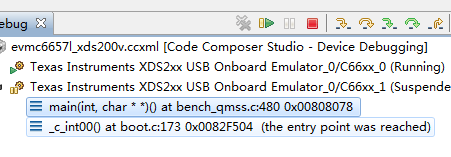
图2 CORE1 运行
- 在thruputTxRxPairPreallocFullLoad()中的设置断点既可以完成接收数据。
thruputTxRxPairPreallocFullLoad()
{
if (selfId == 0)
{
……
}
if (selfId == 1)
{
……
}
}
即在if (selfId == 1)设置断点既可以完成数据接收。